Shelter: sleeping warm when everything is against you
Three hours. That's all the time you have left in cold rain if you don't get out of the wind and off the ground.
It’s 4:30 p.m. in late October. The rain started at noon, a light drizzle, and you thought it would pass. Your jacket is soaked through to the shoulders, your fingers can no longer zip up properly, and night falls in an hour and a half. You have a full water bottle and two energy bars. Neither is going to save you: what kills you tonight isn’t thirst or hunger—it’s the wind on your wet jacket and the cold ground beneath your back.
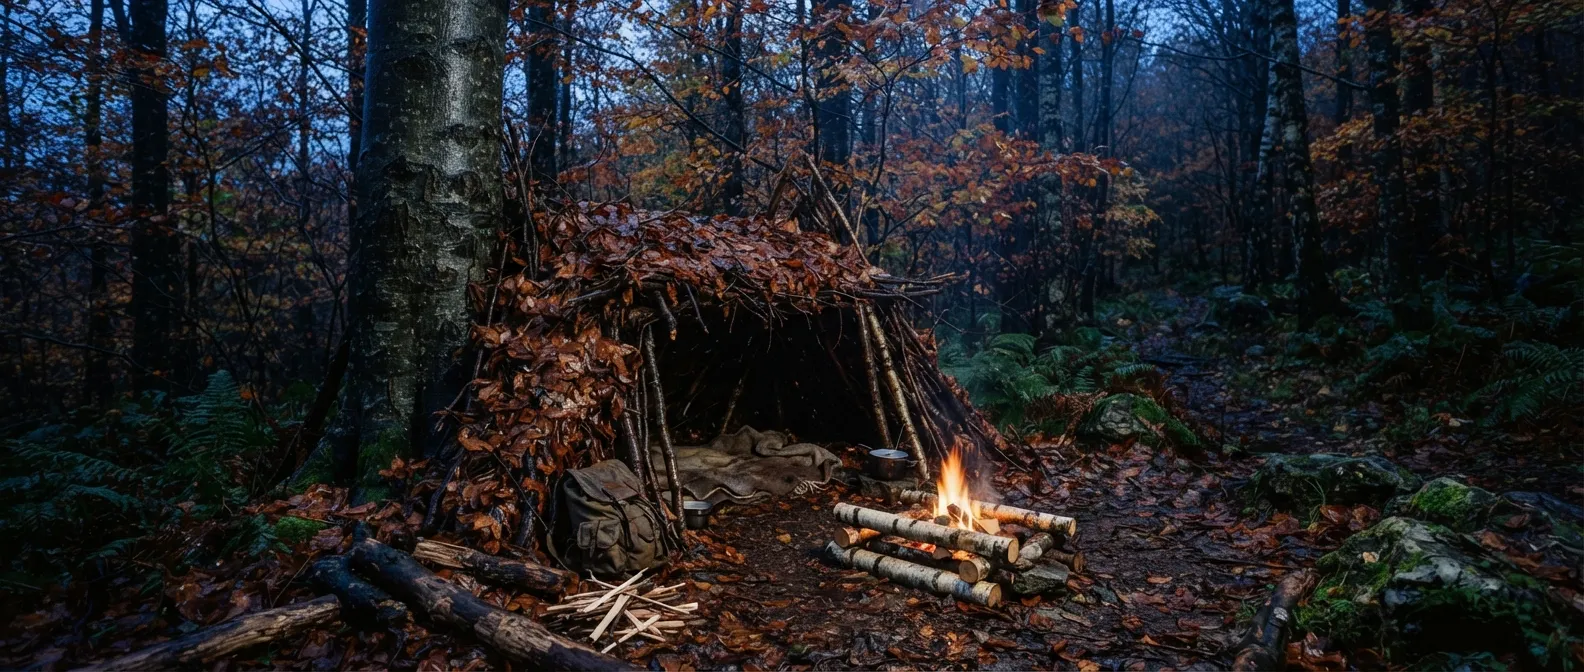
Why shelter comes before water
The rule of threes, you may have run into it before: three minutes without air, three hours without shelter in bad weather, three days without water, three weeks without food. It’s not a physical law, it’s a hierarchy of priorities. And “three hours” is not an exaggeration to scare you: French bushcraft blogs place the risk of hypothermia as low as 8 to 10 °C as soon as rain and wind get involved. You don’t need snow to freeze to death. Most people found dead in the woods died of hypothermia, not starvation.
To build the right shelter, you need to know how your body loses heat. Mountain medicine describes five pathways:
- Conduction: direct contact. Ground, rock, snow, water. Water conducts heat roughly 25 to 30 times faster than air—that’s why wet clothing becomes a heat pump.
- Convection: moving air or water along your skin. That’s wind. At −20 °C, a 30 km/h wind creates a wind chill of −33 °C (official Canadian formula).
- Radiation: your body emits infrared rays like a radiator. Uncovered, this accounts for more than half your heat loss.
- Evaporation: sweat, wet clothing drying on you. Every gram of evaporating water steals heat from you.
- Respiration: the fifth mode, often forgotten. Every exhale expels air at 37 °C saturated with moisture, and you inhale cold, dry air that must be warmed up.
A shelter that works cuts off all five. Wind (convection), ground (conduction), rain (evaporation and conduction), and an enclosure small enough for your own radiation to warm the air around you.
Choosing the site: the 5 Ws
Outdoor instructors summarize site selection using five “W” words. Run through them before laying down your first stick, because a perfect shelter in the wrong place is still a bad shelter.
- Wood: you need it for structure, insulation, and fire, and within arm’s reach. Hauling logs 200 meters in the dark while wet drains energy you don’t have. Pro instructor tip: set up downslope from deadwood so you slide it down rather than carry it up.
- Water: close, but not too close. Around 100 meters away. Never in a dry creek bed, never below the high-water mark: a storm upstream can turn a dry ravine into a river in minutes. Riverbanks also trap fog, humidity, and mosquitoes.
- Weather: where is the prevailing wind coming from? Look for leaning trees, moss, accumulated snow. Position the shelter opening away from the wind and, if possible, facing the morning sun.
- Widowmakers: dead standing trees, broken branches hanging in the canopy, leaning trunks. Look up. A branch always looks smaller from below than it actually is. Rule of thumb from a British instructor: stay away from a dead tree by at least its own height.
- Wigglies: anthills, rock piles harboring snakes and scorpions, muddy mosquito ground, animal burrows. Do a full scan of the area before setting up camp.
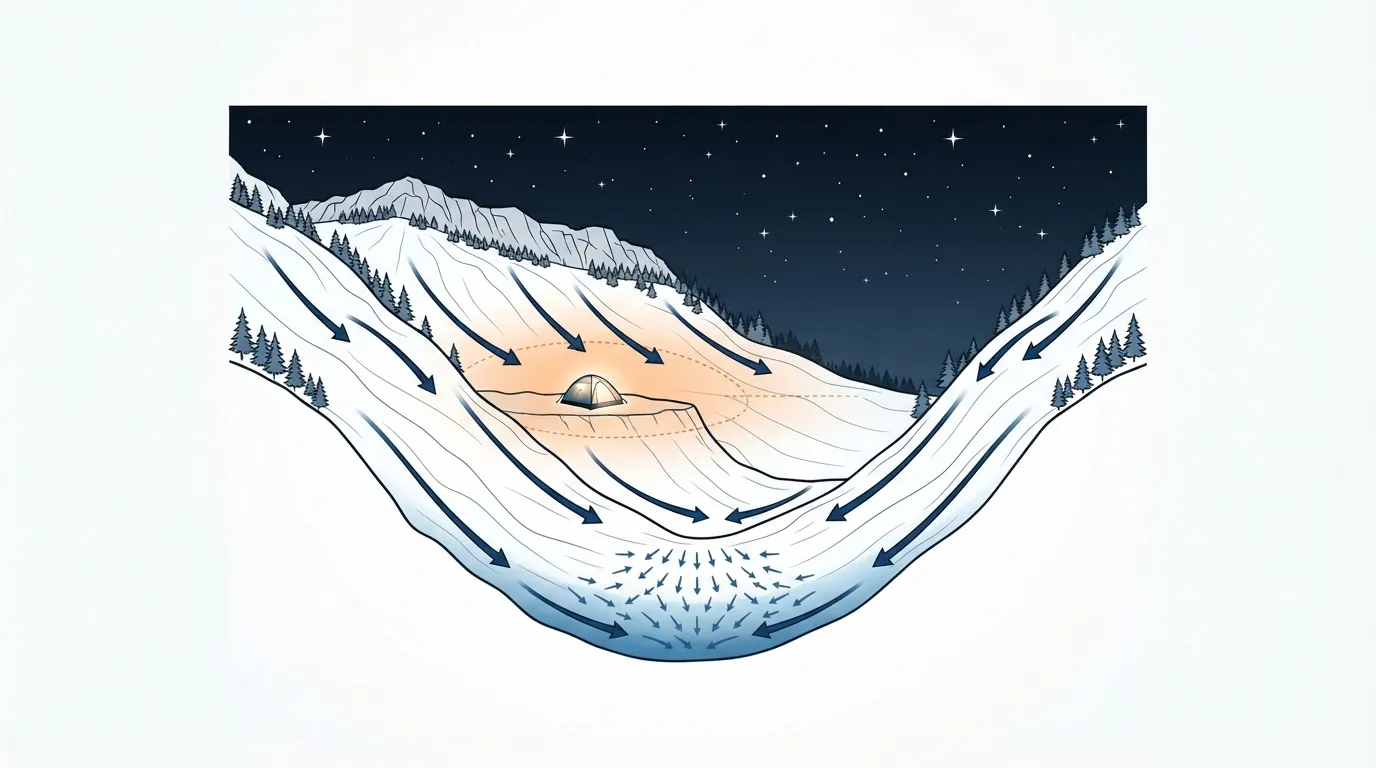
To these five Ws, add the cold air pool. On clear, calm nights, the ground radiates its heat toward the sky; the contacting air cools, grows denser, and flows down slopes like water, pooling at the bottom of valleys, sinkholes, and low-lying clearings. Meteorologists record temperature inversions of 0,3 to 2,5 °C per 100 m: mid-slope can be noticeably warmer than the bottom. The US Military manual puts it bluntly: “avoid low spots, as cold air settles there and insects thrive.” The ideal spot is a flat area slightly above the valley floor, still sheltered from the general wind.
Ground first: what steals your heat while you sleep
Lying down, your body rests on the ground across your entire back, and conduction does the rest. US military manuals state that at rest, up to 80% of heat loss can go into the ground; French guides are more cautious with “half.” Remember the order of magnitude: the ground is your primary enemy, ahead of the air. A sleeping bag placed directly on bare earth is compressed beneath you—no trapped air, meaning zero insulation.
In practice:
- 30 cm of dry debris beneath you (dead leaves, needles, dry ferns, grass): that’s FM 21-76’s specification for a debris hut floor. It compresses; aim for 30 cm after lying on it, not before.
- Conifer branches laid in a herringbone pattern, cut ends facing outward, stacked up to chair-seat height according to Mors Kochanski: a raised bed avoids direct contact with the cold earth and moisture.
- The Sámi lay a mat of birch twigs on the tent floor (lavvu), topped with reindeer hides. Wood first, skin second: two centuries before foam sleeping pads, utilizing the exact same air-layer principle.
- No vegetation? Place an empty backpack under your torso, coiled rope, car floor mats, cardboard. Corrugated cardboard provides R-3 to 4 per inch (2,5 cm)—three to four times better than snow at equal thickness.
The debris hut: the sleeping bag you build
This is the baseline emergency shelter in temperate forests, popularized by Tom Brown Jr. and his tracking school in New Jersey, adopted directly in FM 21-76. Principle: a wedge-shaped skeleton buried under a mountain of leaves. You don’t heat it—you fill it. Your body warms the trapped air pocket, and the thick layer of leaves keeps that heat from escaping.
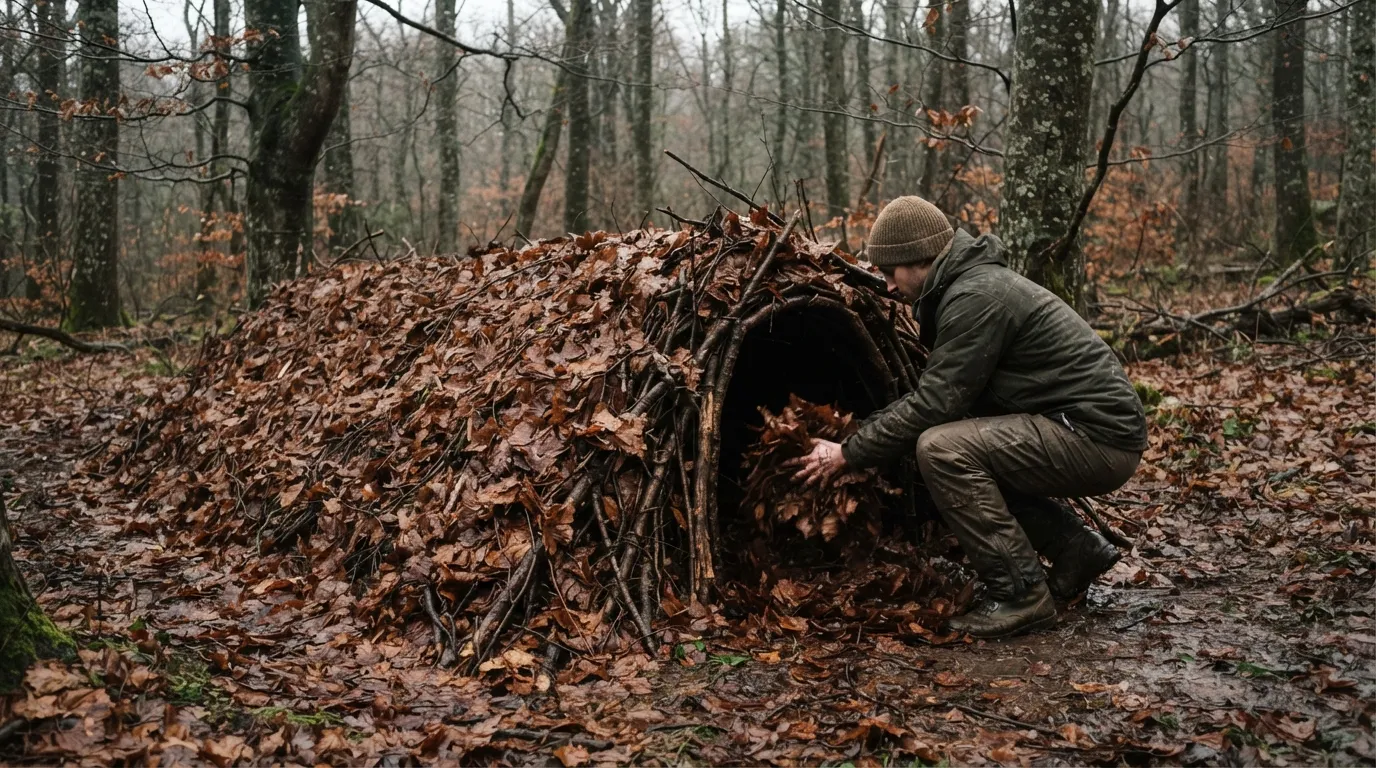
- Choose the ridge pole: a stick about wrist-thick, roughly one and a half times your height long (2,7 to 3,5 m). One end rests on the ground, the other secured at hip height in a tree fork, on a stump, or on a tripod made of two sticks.
- Check the size by lying underneath: the ridge pole should extend 30 to 45 cm past your feet—no more. Interior width: your shoulders plus a hand’s width on each side. Sitting up, your head should almost touch. If it’s too large, you’ll never warm it up. Oversizing is the single most common mistake.
- Lay the ribs: place sticks leaning at a 45° angle along the ridge pole every 15–20 cm on both sides. They shouldn’t protrude above the ridge line, or rain will channel inside.
- Weave a lattice: place thin branches, ferns, or twigs horizontally across the ribs so leaves don’t fall inside.
- Bury the structure in debris: dead leaves, pine needles, dry grass, moss. Target 1 m of thickness per FM 21-76, minimum 60 cm according to survival instructors. The arm test: plunge your arm into the layer—your shoulder should hit the pile before your hand touches the ribs. You need a leaf pile “the size of a small car.”
- Secure the leaves: place a layer of branches over the top so the wind doesn’t strip your shelter during the night.
- Fill the floor: 30 cm of dry leaves inside, packed down by your body weight.
- Prepare the door plug: a pile of leaves or a stuffed bag that you pull in behind you once inside. It should block out all visible light.
Expect 2 to 4 hours on your first attempt, and start at least three hours before nightfall. Rule of thumb from survival instructors: 30 cm of debris keeps you comfortable down to around 10 °C, 60 cm down to 0 °C, and 90 cm down to −7 °C. Without a sleeping bag.
The lean-to, long fire, and super shelter
When you have a fire, the logic flips: instead of trapping heat inside, you open one side of the shelter to let the fire’s heat in. This is the lean-to: two uprights, a ridge pole at 2,5–3 m wide and 1 to 1,2 m high, rafters sloped at 45°, and a roof made of boughs or a tarp. Open facing the fire, back to the wind.
The fire itself should be as long as your body. Mors Kochanski, the Canadian survival instructor who trained a generation of boreal bushcrafters, taught the parallel log fire “the length of your body” built “one large step” from the shelter, using logs “an arm-span long.” Behind the fire, a reflector wall made of green logs (FM 21-76 builds it on four 1,5 m stakes) bounces heat radiation back toward you and blocks the wind.
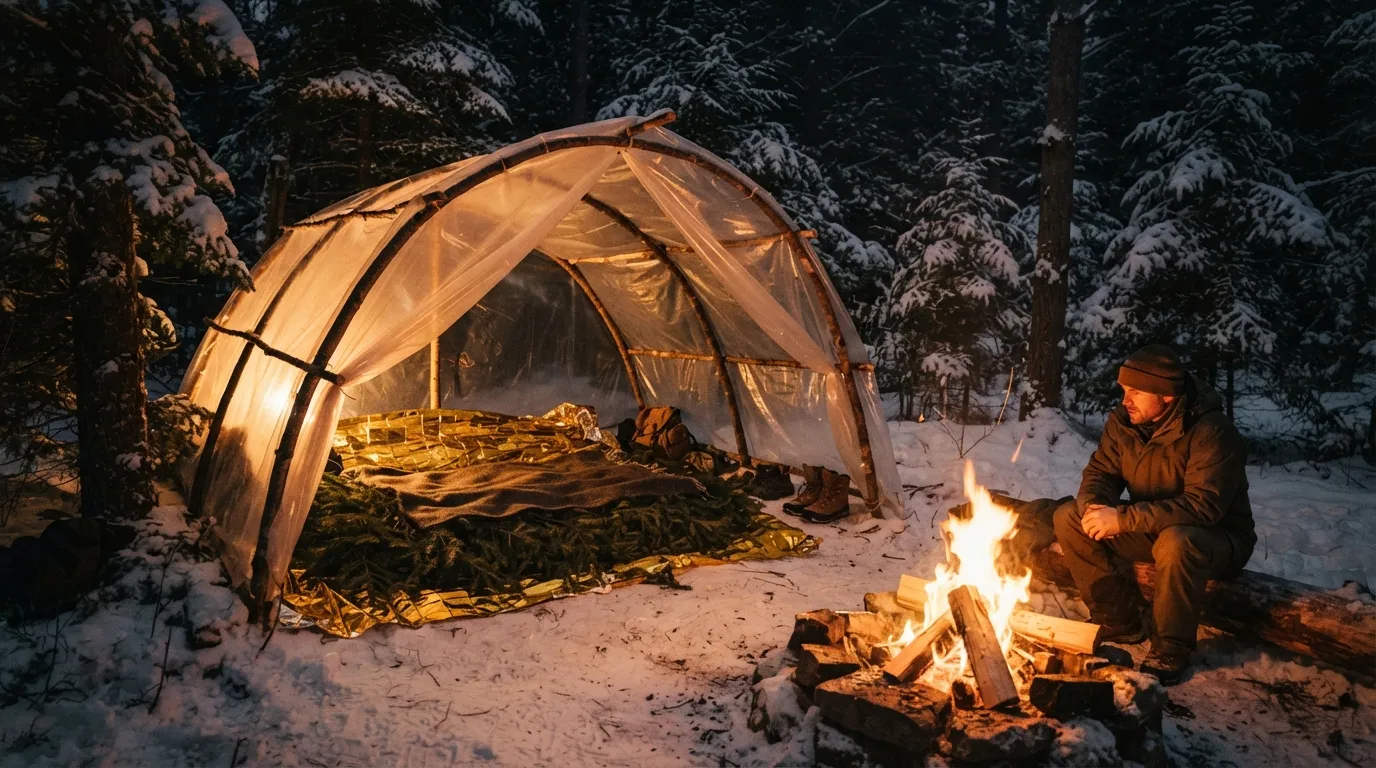
Kochanski’s super shelter takes this concept to its logical extreme. Same lean-to, same long fire, but with two key additions: an aluminized space blanket lines the back wall and roof, and a clear plastic sheet seals the front opening. Infrared radiation from the fire passes straight through the clear plastic, bounces off the mylar backer, and the warmed air cannot escape—creating a greenhouse effect. His students spent nights at −35 °C inside in shirt sleeves. Two caveats: the plastic melts if the fire is too close (keep it at least one meter away), and moisture condenses rapidly in damp climates, making open ends helpful for ventilation.
Tarps: four pitches you should know
A 3 × 3 m tarp with roughly fifteen tie-out points is the most versatile shelter you can carry. Four basic pitches cover almost any situation:
| A-frame | Lean-to | Plow point | Diamond | |
|---|---|---|---|---|
| Shape | A-frame roof over a ridge line | Single sloped panel, open face | One corner raised, opposite corner grounded | Diamond over a ridge line, corners pulled tight |
| Ridge line | Between two trees 2,5–3 m apart | At shoulder height, 45° angle | Single corner at hip height | Diagonal over a hammock |
| Rain | ✅ excellent | ❌ rain blows in open side | ✅ good | ✅ good |
| Wind | ✅ if pitched low & tight | ❌ unless back faces wind | ✅ best: low corner into the wind | ⚠️ fair |
| Fire in front | ❌ | ✅ designed for this | ⚠️ small fire at entrance | ❌ |
| Stakes | 4 to 6 | 2 to 4 | 4 minimum | 2 + tie-outs |
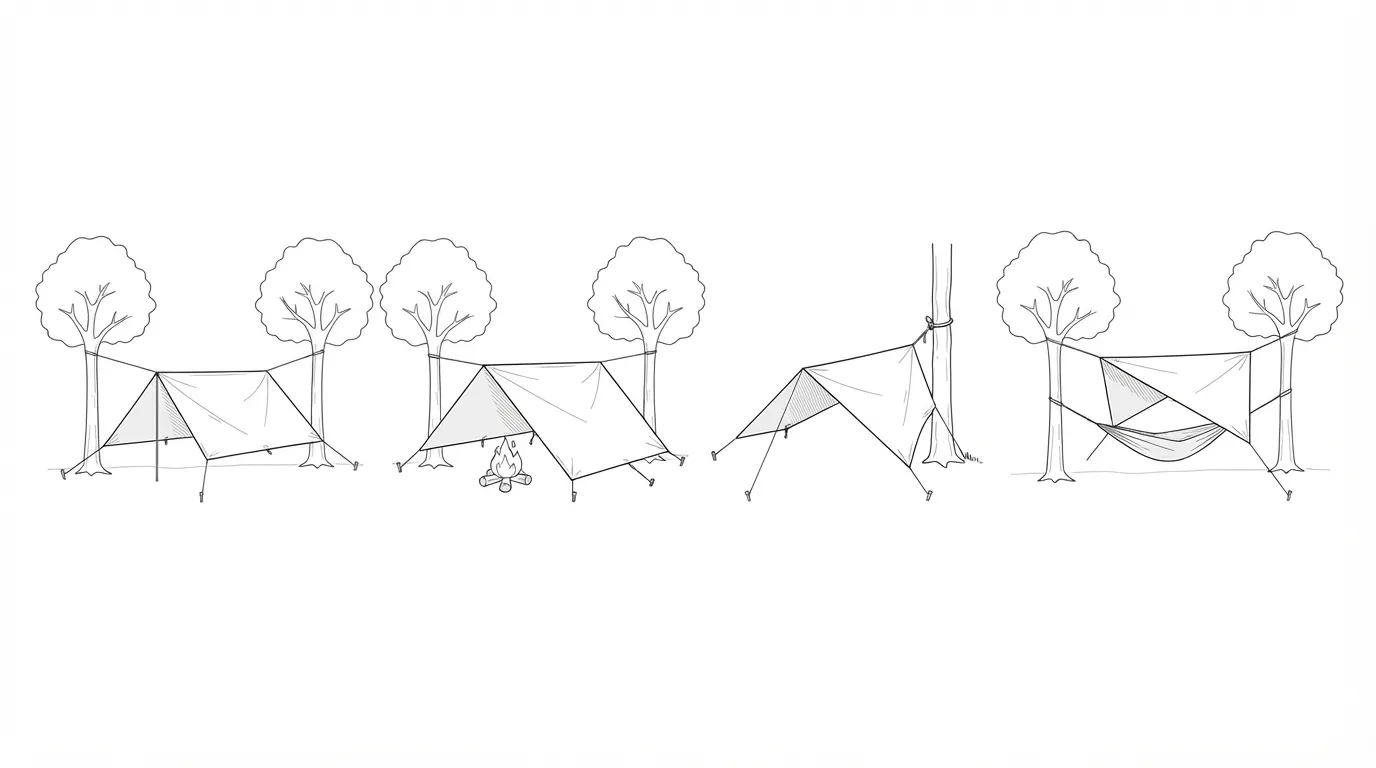
The plow point deserves special mention: one corner tied to a tree at hip height, the opposite corner staked into the wind, and the remaining two corners pulled taut. It pitches in three minutes, sheds wind-driven rain easily, and the low-slung rear corner acts as an effective windbreak. American instructors call it the go-to pitch “when the storm hits in ten minutes.”
In the snow: cold that insulates
Winter’s great paradox: snow is a fantastic insulator. Made of trapped air and ice crystals, a shelter dug into snow maintains an internal temperature around 0 °C even when it’s −40 °C outside. Zero degrees might sound cold, but that’s a forty-degree jump.
The quinzhee
The quinzhee (an Athabaskan word) is the snow shelter of choice where snow is too soft or powdery to cut igloo blocks: you pile it up, let it sinter (harden), and dig it out.
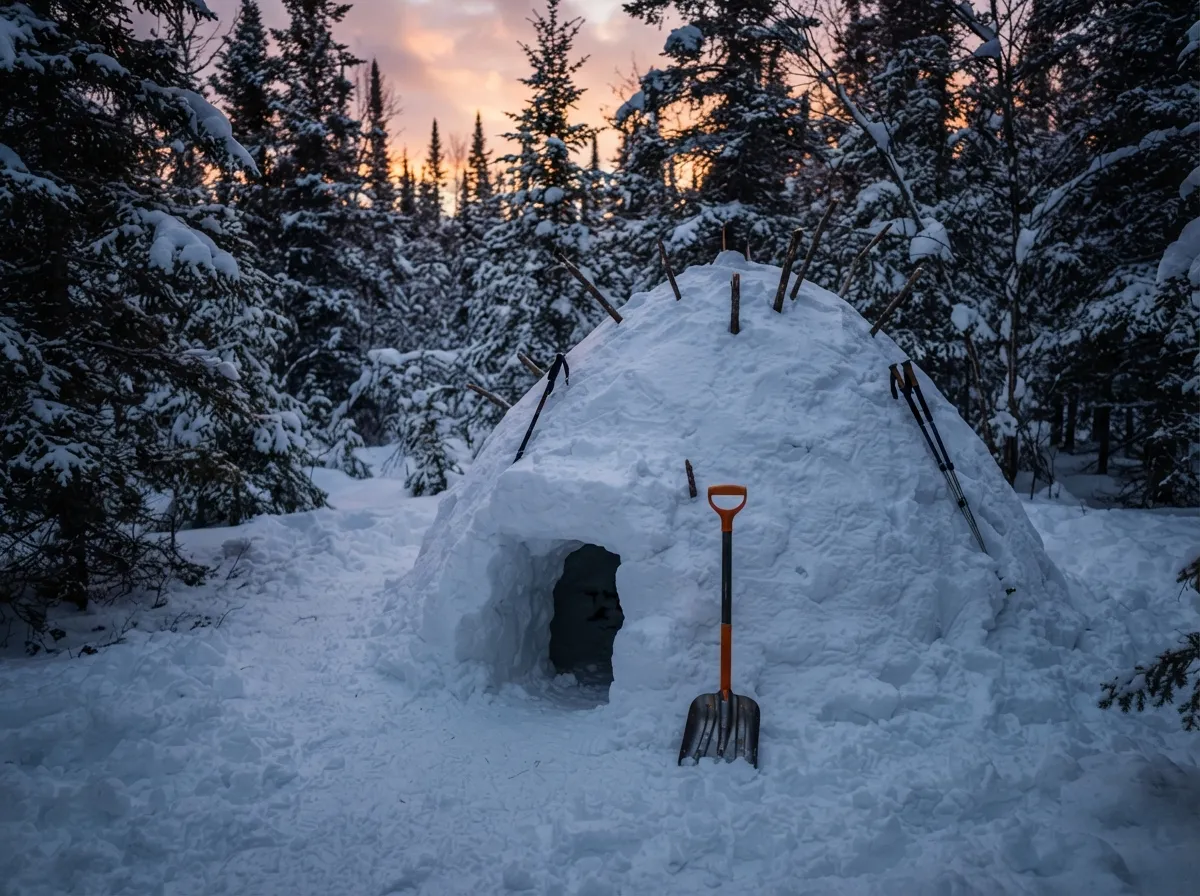
- Pile up a snow dome 1,5 to 2 m high and 3 to 4 m in diameter, mixing snow layers (surface snow and deep snow) to accelerate sintering. Build over backpacks or branches to reduce the volume you need to excavate later.
- Wait at least 2 hours (90 minutes minimum in extreme cold). The ice crystals bond together—a process called sintering. Digging too soon causes the roof to collapse on you.
- Push 30 cm guide sticks into the dome all over, all the way to the hilt. These serve as wall thickness indicators.
- Excavate the entry hole on the leeward side, sloping upward. Hollow out until you hit the tips of your guide sticks: 30 cm wall thickness at the base, 20 cm at the apex. Shape the ceiling into a smooth dome to prevent dripping.
- Elevate the sleeping platform: dig a trench down the center to the ground, leaving a raised 30 cm platform on either side. Cold air sinks into the trench; you sleep above it.
- Poke a vent hole at the top, fist-sized, and keep it clear. Store your shovel inside. Mark the entrance clearly.
The snow temperature needs to remain below −4 °C for proper sintering. A night at 0 °C outside is far more dangerous for a quinzhee than a night at −30 °C. Never raise the internal temperature above freezing with a stove—it will structurally weaken and collapse.
Snow trenches and tree pits
Don’t have the time or snow volume for a dome? FM 31-70 describes the snow trench: dig a trench the length of your body, deep enough to lie down below ground level, and roof it over with skis, poles, or snow blocks topped with a poncho or tarp, then cover with snow. Place a sled or foam pad under your sleeping bag. It gets you out of the wind in twenty minutes.
Under large evergreen trees, snow naturally leaves a hollow around the trunk—a tree pit. Enlarge it, line the bottom with boughs, pack the walls firmly, and pull overhead branches together for cover. Word of warning: tree pits in deep backcountry snow kill off-piste skiers who fall in headfirst; only use one after thoroughly stabilizing the sides.
Snow caves and igloos
A snow cave is dug into a drifted snowbank on the leeward side of a ridge, with an entry tunnel positioned lower than the main sleeping chamber: warm air rises, while cold air drains out the door. Keep walls and roof at least 30 cm thick, arch the ceiling smoothly, and build a raised sleeping bench. Plan on three to four hours of heavy digging for two people, requiring a snow depth of at least 1,2 to 1,5 meters.
An igloo is an entirely different discipline: not piled snow, but solid blocks cut with a snow saw (pana) from wind-packed hardpack snow, laid in a rising spiral where each block leans against the previous one without scaffolding or center keystone. Inuit hunters perfected this art; features included a freshwater ice window, a cold-trap entry tunnel below floor level, and a raised sleeping bench. Heated solely by human body heat, the interior stays between −7 and +16 °C. It requires years of practice and specific snow conditions—you cannot improvise an igloo out of soft powder.
In the heat: shade and the earth
In hot deserts, a shelter doesn’t trap heat—it blocks it. You have two levers: shade and sub-surface depth.
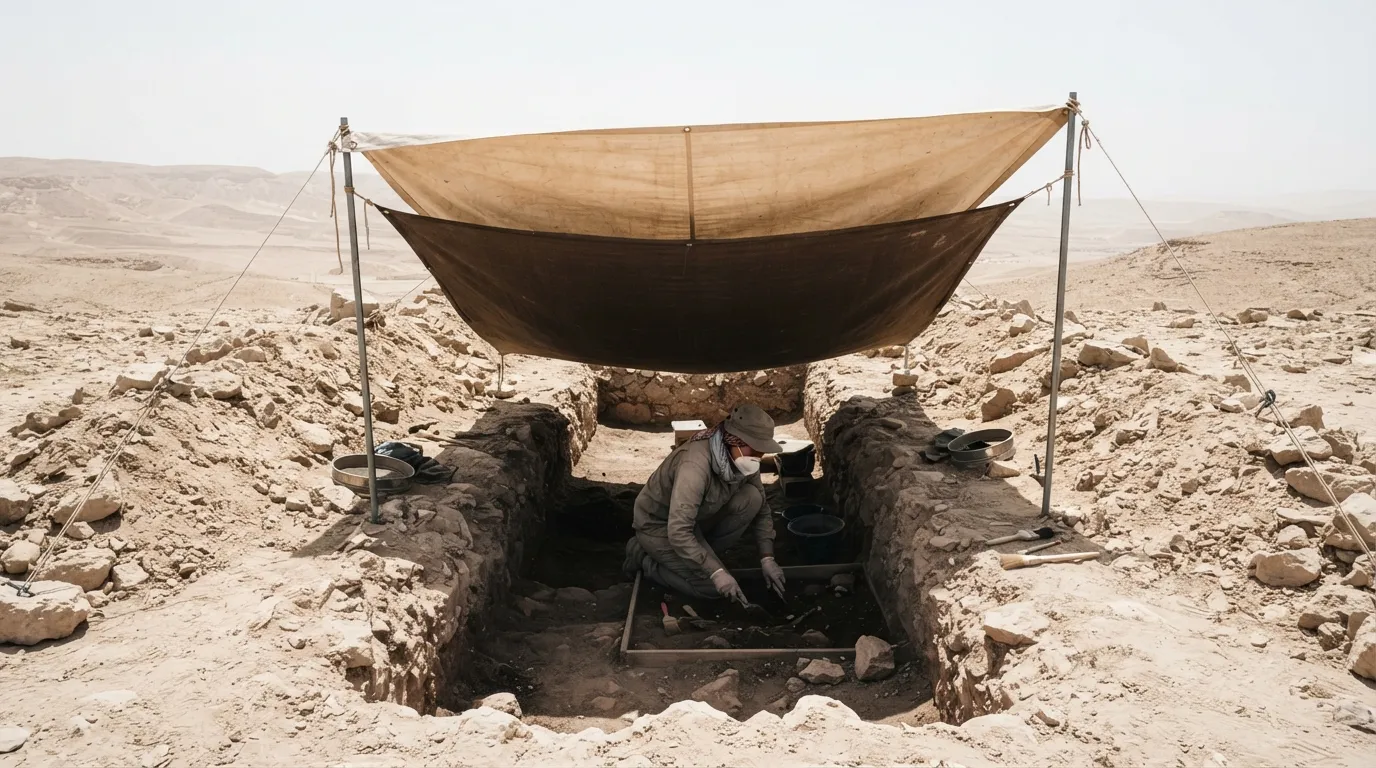
FM 21-76 gives precise specs: a trench 45 to 60 cm deep, as long as your body, with excavated soil piled on three sides and a cloth stretched overhead, drops midday temperatures inside by 16 to 22 °C. Adding a second layer of fabric 30 to 45 cm above the first creates an insulating air gap that vents heat, dropping temperatures further. Light-colored on the outside to reflect light, dark on the inside to create shade. Most importantly, dig before the midday heat hits or after sunset: physical exertion causes you to sweat away precious water you can’t afford to lose.
In warm temperate climates, two rules suffice: elevate (a bed raised 30 cm off the ground lets air circulate underneath while keeping bugs away) and shade without closing off airflow. On a beach, survival manuals recommend orienting your shelter trench north-south so it receives minimal direct sunlight, positioned above the high-tide line.
Improvised single-item shelters
Your car
A car stranded in a snowstorm is a shelter: stay inside it. People die when they leave their vehicle to “go find help” and get disoriented 200 meters away in a whiteout. Run the engine 10 minutes per hour for heat—no more; clear snow from the exhaust pipe every time; crack a window slightly on the downwind side. In a test conducted by a US television network using industrial detectors, a snow-clogged tailpipe drove carbon monoxide levels inside the cabin to 90 ppm in just 1 min 24 s. Insulate yourself using floor mats, seat covers, and paper road maps. Tie a bright cloth to the antenna, leave the dome light on when the engine is running, and move your arms and legs regularly to maintain circulation.
Space blankets: what they do, what they don’t
Invented by NASA in 1964, the emergency blanket (space blanket) is a sheet of metallized polyester. It does three things and three things only: it reflects infrared body heat (manufacturers claim 90%, independent testing shows roughly 80%), it blocks wind, and it stops rain. What it doesn’t do: insulate. It contains no trapped air space or loft. Wrapped around you while lying directly on cold ground, conductive heat loss continues as if it weren’t there.
The military poncho serves a similar role in FM 21-76: pitched as a lean-to (a ridge line between two trees at waist height, three ground stakes, and 10 cm “drip sticks” tied to lines so rain doesn’t run down into the shelter) or a low A-frame (two trees 2–3 m apart, lines at knee height). A cheap emergency poncho does the same thing, half as well, for a fraction of the cost.
Sleeping warm: free field hacks
The hot-stone bed
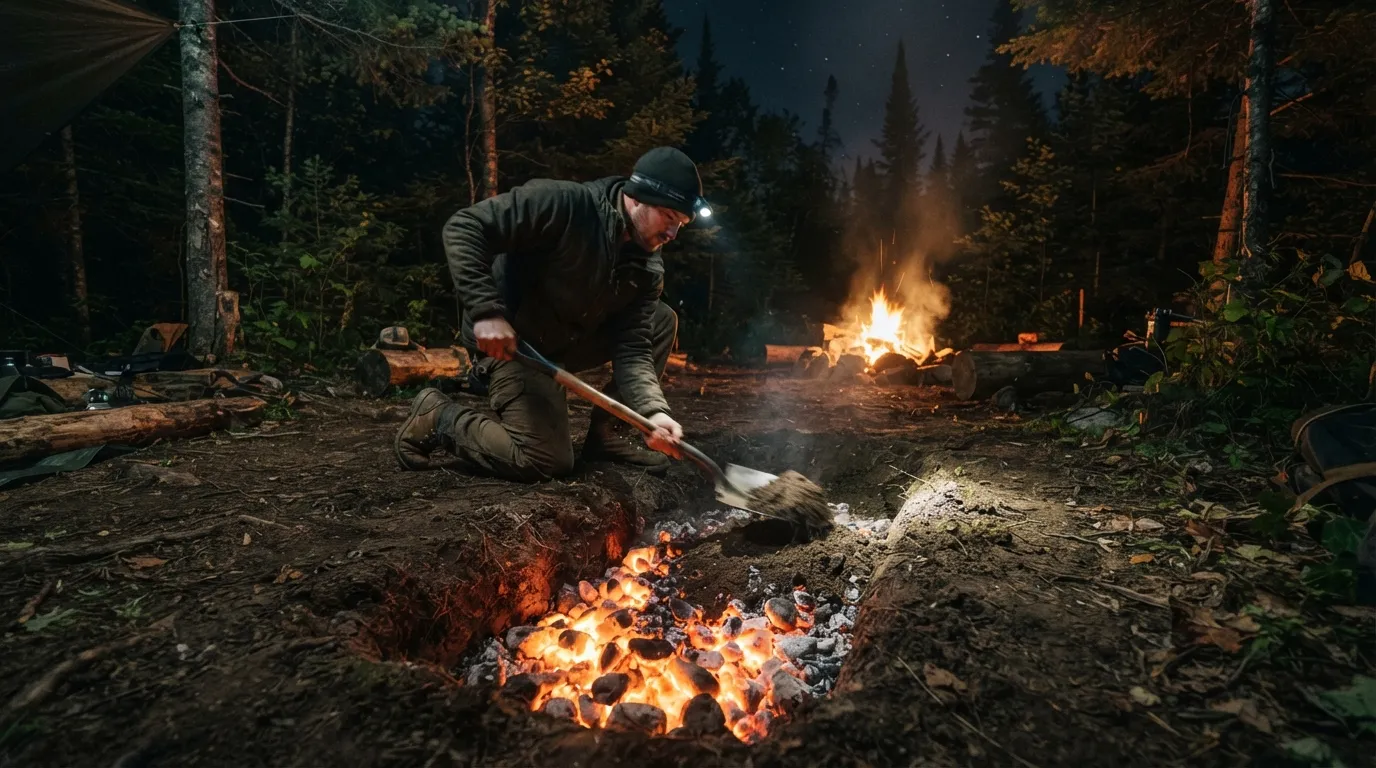
Heat dense, dry rocks in a fire for an hour or two, sourcing them far from water sources (river rocks contain trapped moisture and explode violently when heated). Dig a trench 15 to 30 cm deep beneath your planned sleeping area, fill it with the hot stones, cover with 15 to 20 cm of dirt, and wait half an hour before lying down. Alternatively, rake hot embers from a long fire into the trench and cover with soil to the same depth. American cowboys used this technique, and historical accounts describe Mongolian herders burying coals beneath yurt floors. Be cautious around root-rich soil or dry duff, which can smolder underground for hours.
Huddling and sleep position
When sharing a shelter, sleep back-to-back or spooning: US military doctrine mandates the “buddy system” in winter, where partners check each other’s faces for frostbite upon waking. For mild hypothermia, mountain rescue protocols allow a warm, dry person to share a sleeping bag with the victim. Emperor penguins conserve up to forty degrees of warmth by huddling; with two people, you significantly reduce exposed body surface area.
Sleeping position: curling into a ball on your side minimizes exposed surface area—the same principle behind the HELP position (knees pulled tight to chest) which reduces heat loss in cold water by a third. However, lying on your side concentrates your body weight on your hip and shoulder, crushing insulation underneath. If your ground pad or leaf bed is thin, you’ll develop cold spots. Lying flat on your back spreads your weight evenly but increases surface contact area. The field-tested compromise: sleep on your side over a thick bed of debris, placing folded spare clothing under your hip.
Pre-sleep routine
- Warm up beforehand: a sleeping bag doesn’t generate heat—it retains it. Getting in cold means staying cold. Doing thirty jumping jacks or push-ups before crawling inside—without sweating—changes your whole night.
- Eat high-fat, high-carb food: digestion generates internal heat, and fats burn slowly through the night.
- Hot water bottle: place a securely sealed bottle filled with hot water between your thighs or against your stomach.
- Change into dry socks and base layers, even if your current ones feel only slightly damp. FM 31-70 makes this mandatory for troops.
- Don’t breathe into your bag: moisture in your breath deposits up to half a liter of water per night into your insulation, destroying loft.
Frequently asked questions
How long can you survive without shelter in cold weather?
About three hours if you are wet and exposed to wind below 10 °C, which doesn’t require snow: hypothermia can kill in simple cold, windy rain. This is why shelter ranks above water and food in survival priorities.
Do you really lose 40% of your heat through your head?
No, this myth stems from a flawed 1950s military experiment where test subjects wore warm arctic suits with uncovered heads. In reality, the head accounts for 7 to 10% of body surface area and roughly the same percentage of heat loss; ground contact (conduction, up to half of heat loss when lying down) and uncovered torso/limbs matter far more.
How do you build a survival shelter in the woods without a tent?
The debris hut is the standard choice: a wedge-shaped stick framework just large enough for your body, buried under roughly one meter of dead leaves and moss. It isn’t heated by a fire—it’s stuffed with insulating debris, relying on your body heat to warm the trapped air inside.
Will a space blanket keep you warm all night?
No, it only reflects radiant infrared body heat, blocks wind, and stops rain, but provides zero insulation because it traps no air space. Placed directly on cold ground, conductive heat loss continues unchecked; it should be used as an outer shell over insulation or as a heat reflector behind a fire.
How do you sleep warm in the snow?
A shelter excavated from snow (like a quinzhee) maintains interior temperatures near 0 °C even if it’s −40 °C outside, because packed snow traps insulating air pockets. Allow piled snow to sinter for at least two hours before digging, maintain an open air vent, elevate your sleeping bench above a cold-air trench, and never run a stove inside due to carbon monoxide risks.
Should you stay in a snowbound car or go look for help?
Stay inside: most winter vehicle fatalities happen when people leave their car to search for help and freeze after becoming disoriented a few hundred meters away in a blizzard. Run the engine for ten minutes per hour max, clear snow from the exhaust pipe every time, and crack a downwind window to prevent carbon monoxide poisoning.
Key takeaways
- Shelter before water: wet, exposed to wind, and under 10 °C, you have roughly three hours. Hunger and thirst can wait.
- Ground first: at least half your heat drains directly into the earth. Lay 30 cm of dry debris or build a raised bough bed before even thinking about a roof.
- Small, thick, sealed: a debris hut is filled, not heated. A hand’s breadth on either side of your shoulders, one meter of leaves, and a door plug to seal the entrance.
- Snow shelters: always vent: 30 cm walls, raised sleeping bench, clear air vent, shovel inside, and never run a stove inside.
- Space blankets block wind and reflect radiation—they do not insulate: use them over insulation or as a fire reflector wall. Never rely on one alone for the night.
Further reading
- Mors Kochanski, Bushcraft: Outdoor Skills and Wilderness Survival (Lone Pine, 1988): the boreal classic, and origin of the super shelter and long fire.
- Cody Lundin, 98.6 Degrees: The Art of Keeping Your Ass Alive (Gibbs Smith, 2003): built around core body temperature regulation, highlighting trash bags and space blankets.
- US Army Survival Manual FM 21-76 / FM 3-05.70, Chapter 5 “Shelters”: free online, precise specs, and the source of many dimensions cited here.
- The Mountaineers, Mountaineering: The Freedom of the Hills: snow shelter chapters, the benchmark reference for alpine travel.
Sources for this module (22)
- FM 3-05.70 (ex FM 21-76) US Army Survival, chapitre 5 : Shelters
- FM 31-70 Basic Cold Weather Manual, ch. 3 : Small Unit Living
- Woodland Ways : The Mors Kochanski Super Shelter
- Bull Moose Patrol : Top 10 Survival Concepts I Learned from Mors Kochanski
- Salt & Prepper : Debris Hut (d'après Tom Brown Jr.)
- Esprit Survie : Construire un abri de survie en forêt
- Wikipedia : Quinzhee
- Wikipedia : Snow cave
- Traditional Mountaineering : Snow caves can kill the uninformed
- New World Encyclopedia : Igloo
- American Family Physician : Diagnosis and Treatment of Hypothermia (2004)
- Wilderness Medical Society : Accidental Hypothermia Guidelines, résumé
- OutdoorEd : Hypothermia, Field Assessment and Treatment
- grough : Hats, heads and heat, medics debunk decades-old myth (BMJ 2008)
- Michael D. Ganis : The Space Blanket Myth
- Wikipedia : Cold-air pool
- UBC ATSC 113 : Cold Air Pooling
- Survive and Revive : The 5 W's of site selection
- 74FDC : The Bedouin tent, cool in the day, warm at night
- Fox Weather : How to survive your car stuck during a winter storm
- Cody Lundin, 98.6 Degrees: The Art of Keeping Your Ass Alive (Gibbs Smith, 2003)
- Mors Kochanski, Bushcraft: Outdoor Skills and Wilderness Survival (Lone Pine, 1988)
Continue in "The fundamentals"
Mindset: the key to everything
Before fire, before water, before shelter: what happens in your head during the first ten minutes.
Water: Finding, collecting, and making it drinkable
Three days without water is the popular myth. The real question is where it's hiding and what's inside it.
Fire: light it anywhere, keep it always
In the rain, on the snow, without a lighter: the physics of fire, techniques that work, and those that only work in the movies.